If you need a place to plan and track work, the first thing to do is create project space that fits your team. This guide walks through every setting I recommend when you create project in Tracker so you start with a clean, predictable setup. I use a direct, hands-on style—follow each step and you will have a working project ready for planning and iteration management.
Step 1: Create project and pick the right account
Begin at the dashboard. Click the Create Project button in the upper right. Enter a clear, descriptive name so teammates instantly know this project's purpose. Then choose the account where the project will live. Think of an account as a file cabinet that holds projects, not as your personal login. If you joined a company account you will likely select that; if you manage multiple clients you can keep projects separated by account.
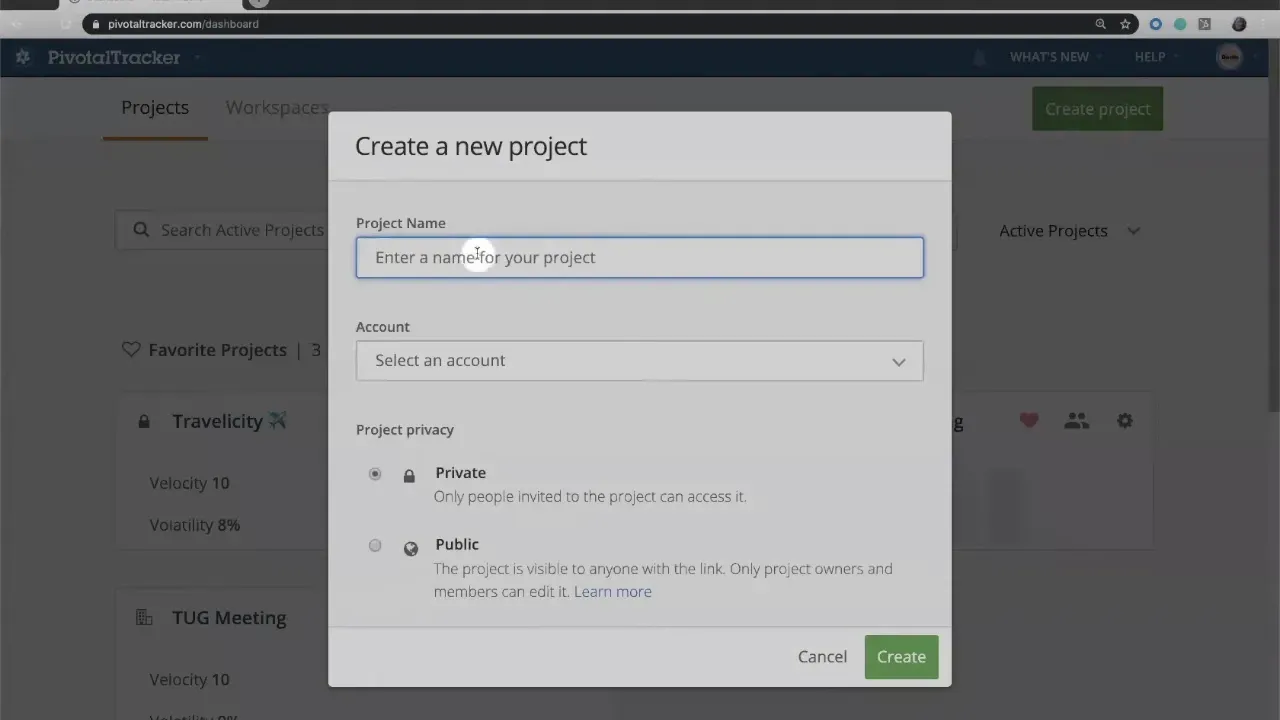
When you create project in the correct account you avoid later confusion about ownership, billing, and who can invite people. After selecting the account, click Create to open your new project.
Step 2: Choose privacy and visibility
Immediately after you create project, decide whether it should be private or public. Private projects restrict access to people you invite. Public projects let anyone with the URL view the project, while still limiting edits to project members and owners. Public projects are useful for open source or student work where transparency is important.
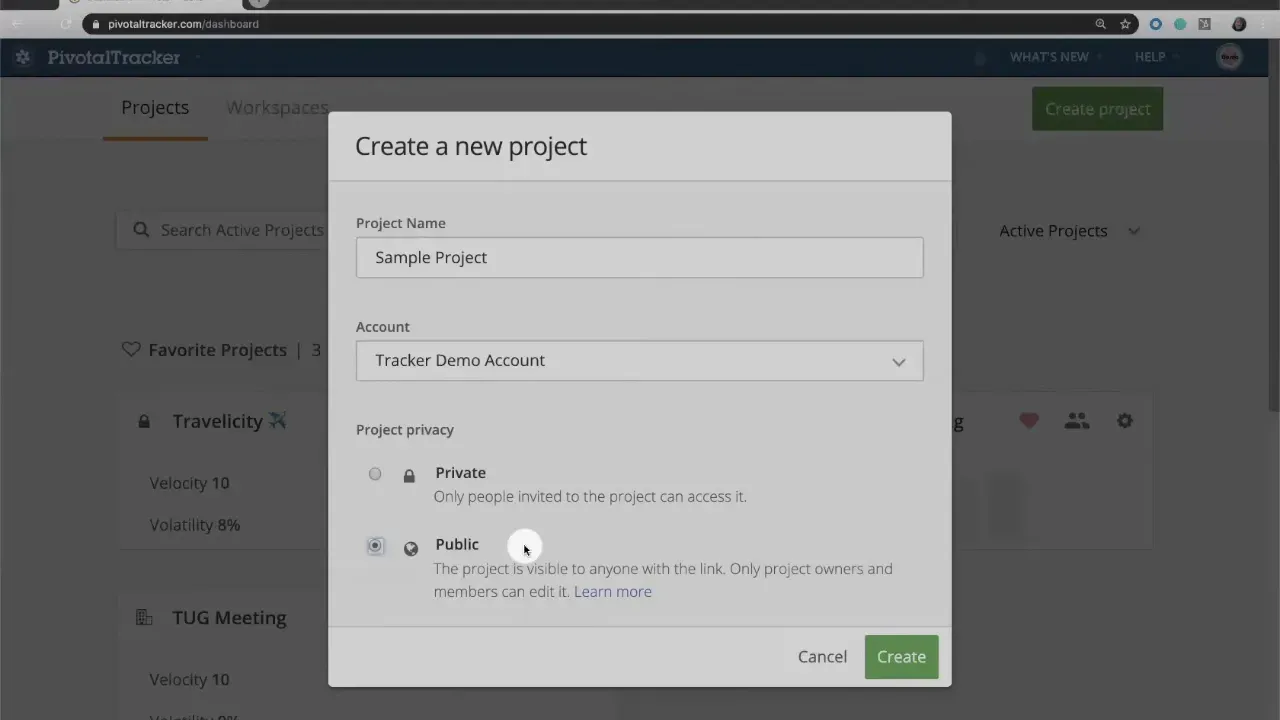
I usually recommend private for company work. If you change your mind later, you can toggle visibility on or off in settings.
Step 3: Configure iteration cadence and time zone
Now set the rhythm your team will follow. Under Iterations and Velocity you can set:
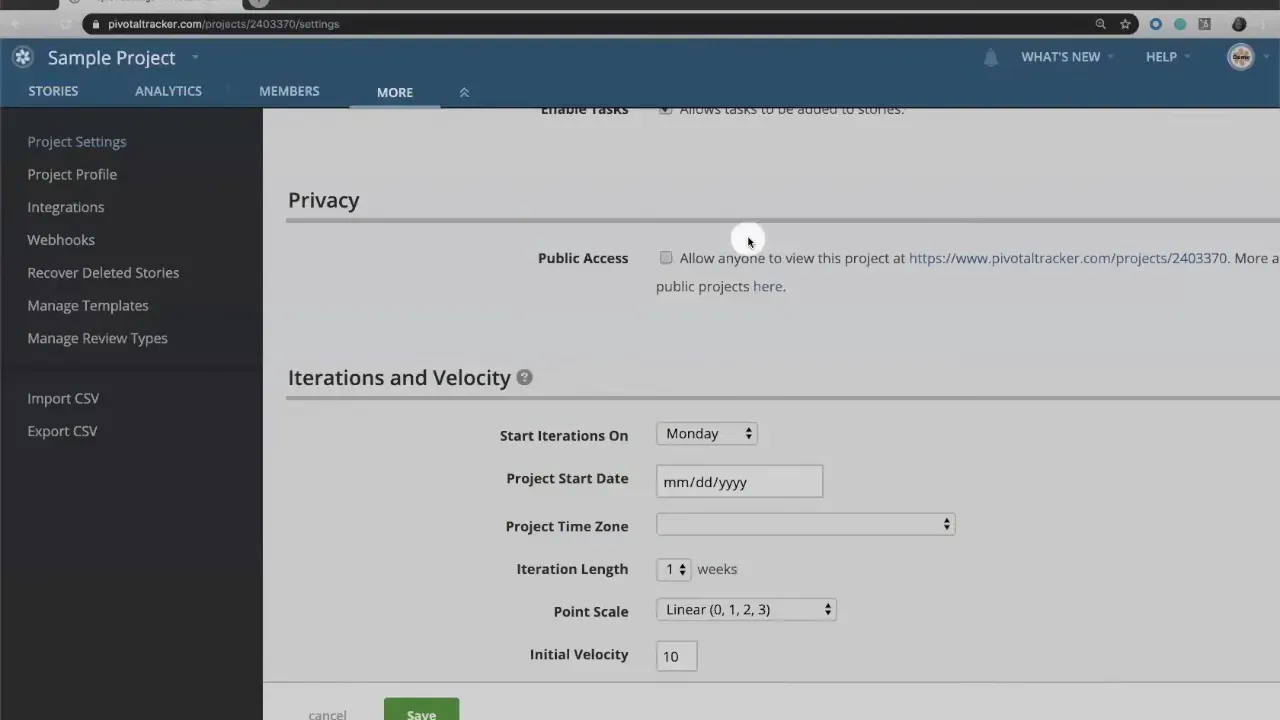
- Iteration start day — Monday is the default, but choose whatever matches your team schedule.
- Time zone — useful when teams span multiple regions.
- Iteration length — from one to four weeks. One week is the default and works well for small, frequent deliveries.
These choices affect how Tracker slices work into predictable increments, so pick the cadence that keeps feedback frequent without creating overhead.
Step 4: Set a point scale and initial velocity
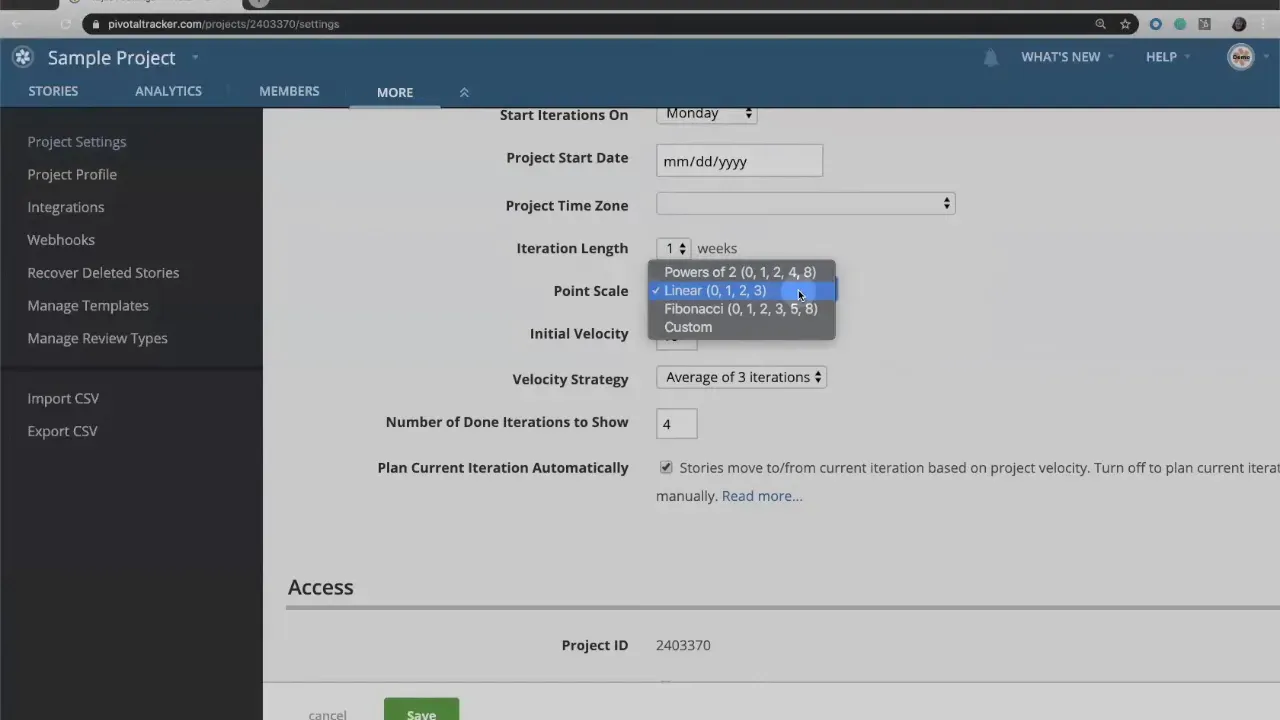
Points are how Tracker measures relative effort, complexity, and risk. When you create project you set the point scale. Common options include:
- Linear (0, 1, 2, 3) — the default and recommended for one-week iterations and small stories.
- Fibonacci or powers of two — useful when iterations are longer and stories are larger.
- Custom — enter whatever values your team already uses.
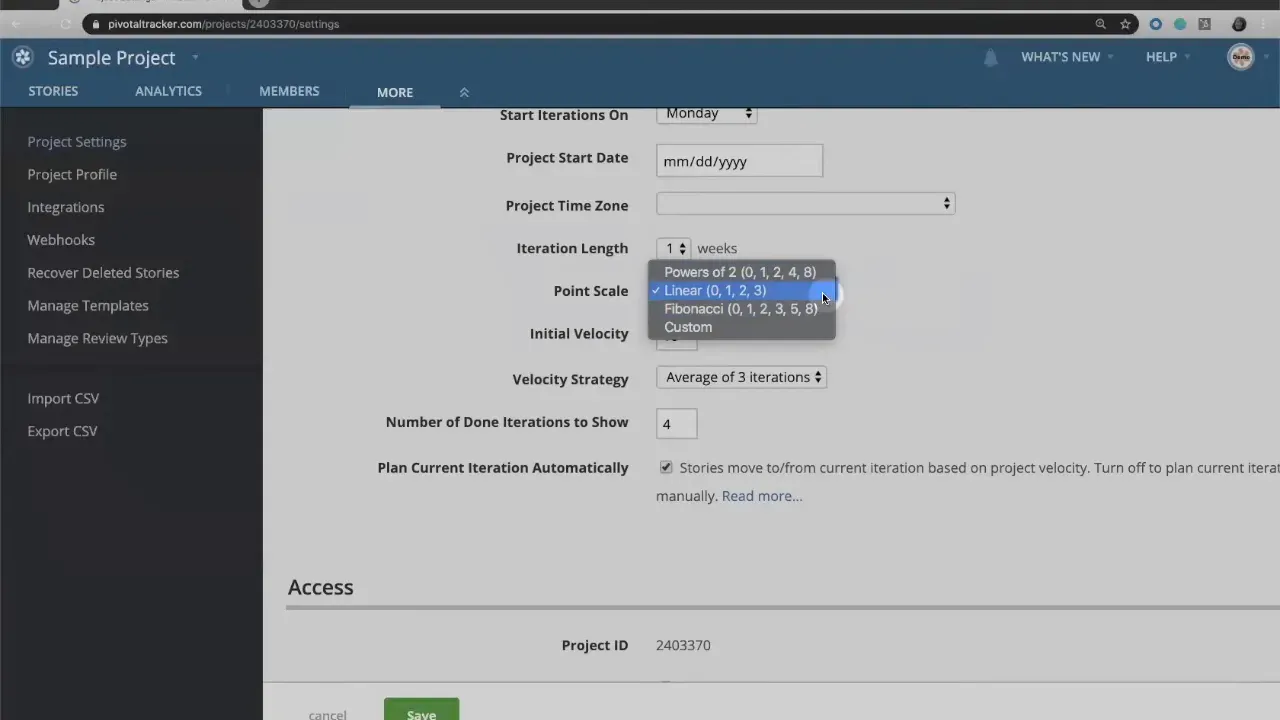
Right beneath the point scale is Initial Velocity. For the very first iteration Tracker has no history to estimate how much the team can complete, so set a sensible initial velocity: a conservative number of story points you think the team can finish. Tracker will use that number for the first planning round.
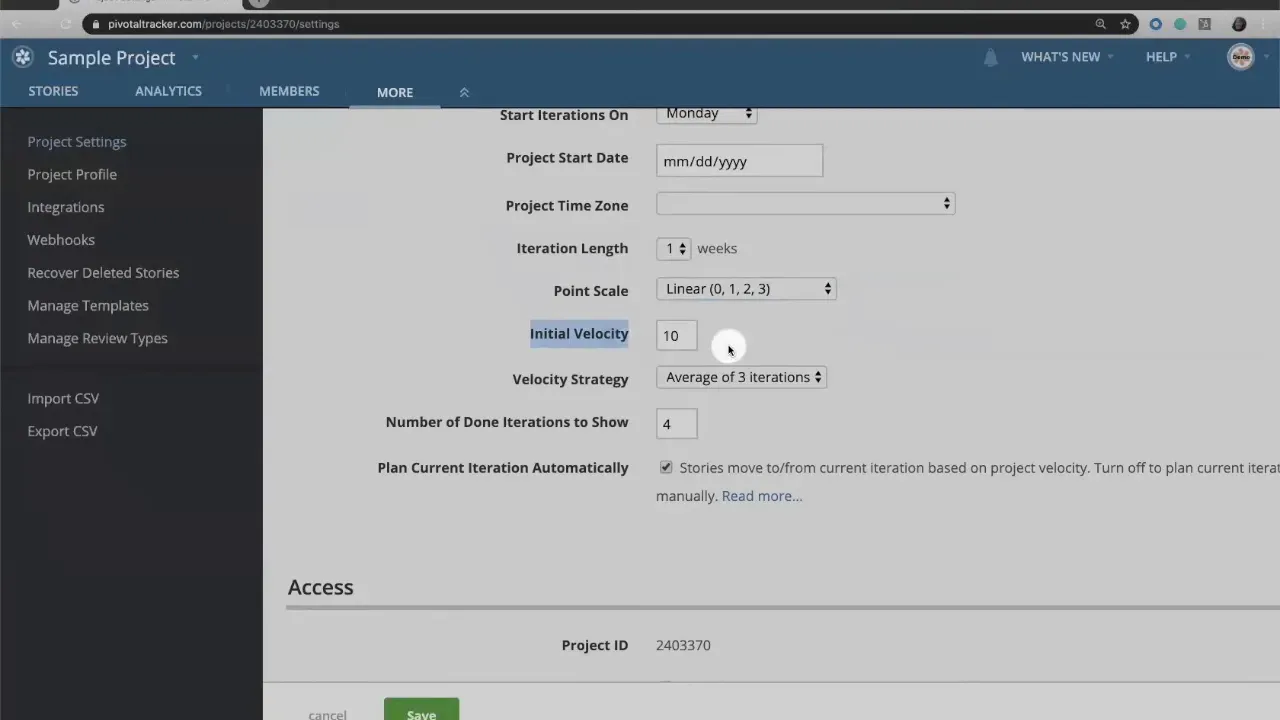
Step 5: Choose a velocity strategy and auto-planning behavior
Velocity strategy controls how Tracker calculates future capacity. The default is an average of the last three iterations. That means Tracker will average the last three completed iteration totals and plan the current iteration and backlog based on that average.

You can also choose how many done iterations to show by default and whether Tracker should automatically plan the current iteration for you. If you uncheck auto-plan for the current iteration you can manually select which stories go into it. Note that unchecking this option does not stop Tracker from planning the backlog automatically; it only affects that active iteration.
Step 6: Decide how you treat bugs, chores, and API access
Scroll further down to review options that control day-to-day behavior:
- Points on bugs and chores — choose whether non-story items should consume velocity.
- API access — enable this if you plan to use mobile apps or automation.
- Incoming emails — configure to allow story creation by email if helpful.
- Privacy controls — hide email addresses and tweak public-access behavior.
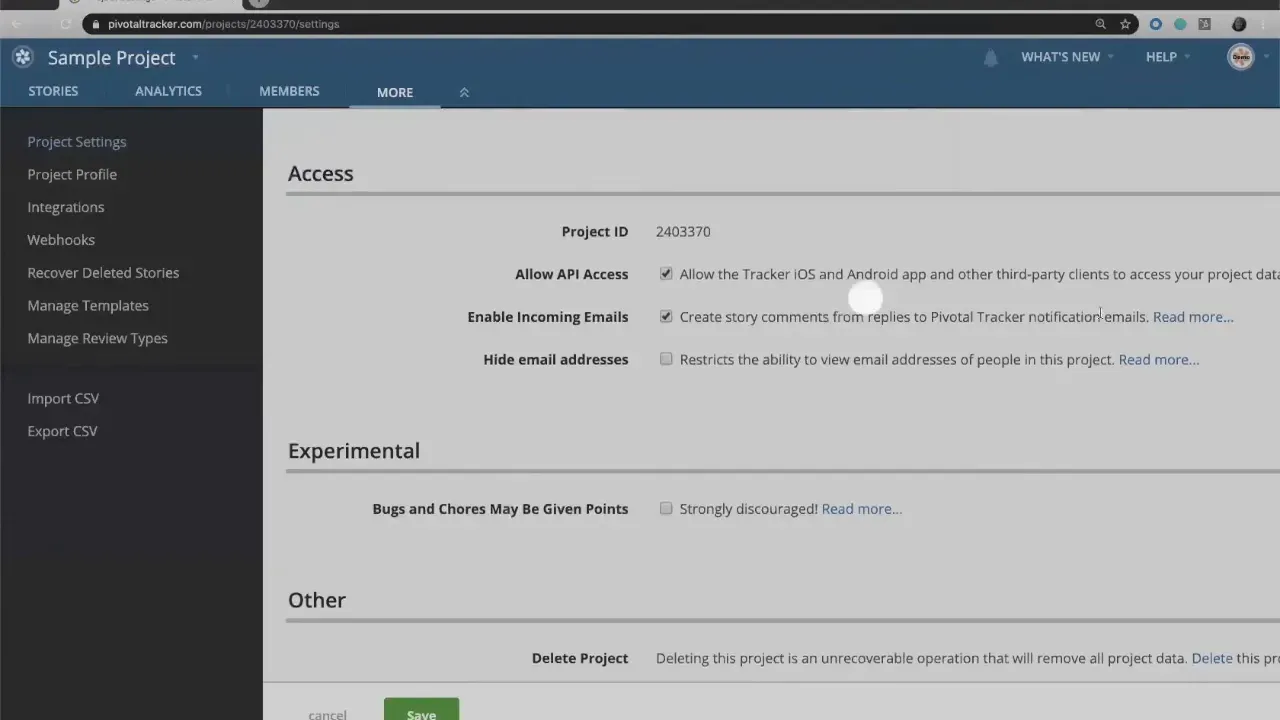
These settings help you align Tracker to how your team actually works. For example, teams that want accurate velocity numbers often give bugs and chores points so those efforts are reflected in capacity calculations.
Step 7: Fill the project profile and add integrations
Complete the project profile with a description and any helpful context for teammates. Then set up integrations. You can add webhooks, connect external tools, and configure custom story templates and review types. Project owners and admins can also recover deleted stories if needed and import or export stories from CSV if you are migrating work.
Integrations are a force multiplier. If your build, CI, or chat tools can talk to Tracker, automating status updates and story links reduces manual work and keeps the team aligned.
Step 8: Invite team members and begin planning
Finally, invite the people who will collaborate. Remember: project privacy controls who can see the project, and member roles control who can edit. Invite only the right mix of contributors and reviewers, assign initial stories, and let Tracker start using your velocity settings to scope upcoming iterations.
An account is like a file cabinet that holds projects, just like a file cabinet holds files.
Once you create project, Tracker will start planning backlog items according to the velocity strategy you selected. Watch early iterations closely and adjust initial velocity and point scale if estimates skew too optimistic or conservative.
FAQ
What is the difference between an account and a login?
A login is associated with a person. An account is a container that holds multiple projects, similar to a file cabinet. Pick the account that matches who should own the project for billing and access purposes.
Can I change a project from private to public later?
Yes. You can toggle public access on or off in the project settings at any time. Public projects allow anyone with the URL to view them while still restricting edits to members and owners.
How should I pick an iteration length?
Choose an iteration length that balances feedback with overhead. One-week iterations push frequent feedback and smaller stories. Longer iterations may work for larger teams or complex features, but can increase planning complexity.
Should bugs and chores have points?
It depends on whether you want non-feature work to affect velocity. If you want velocity to reflect all time-consuming work, assign points to bugs and chores. If you want a purer measure of feature delivery, leave them unpointed.
How does Tracker calculate velocity after the first iteration?
After the first iteration Tracker looks at the number of points completed and uses the velocity strategy you chose—typically an average of the last three iterations—to plan future work. You can adjust how many iterations are averaged in settings.
Can I import stories from a CSV file?
Yes. The project settings allow import and export of stories via CSV, which is useful when migrating or bootstrapping a backlog.
Where do I configure integrations and webhooks?
Open Integrations in the project sidebar. You can add webhooks, connect tools, and configure custom story templates and review types from that panel.
What should I do if my initial velocity is wrong?
Adjust it after the first few iterations. Tracker recalculates based on completed points and your velocity strategy. Use real completed work as the basis for subsequent planning.
Credits: This tutorial is created based on this original video Creating your first Tracker project